Connect to Prince using a remote desktop to analyze your data in RStudio, visualize in IGV, and interact with other GUI applications on the HPC.
Instructions for Mac users
Initial Setup:
- Download VNC Viewer:
https://www.realvnc.com/en/connect/download/viewer/ - Setup a VNC password on Prince:
Login to Prince and type the command vncpasswd
If you ever forget your VNC password, you can reset it at anytime by typing vncpasswd again (it will ask you to enter a password, then confirm the password) - Copy this script into your home folder:
prince:/scratch/work/cgsb/scripts/launch_vnc/launch-vnc.sh
Once initial setup is complete, you can launch a vnc session and connect to it at any time by doing the following:
- Submit the sbtach script (which you obtained above) to the queue, like this:
> sbatch launch-vnc.sh - Once the job is running, look for the output file called VNC.o1234567, where ‘1234567’ is your job ID. Open that file and copy the first ssh command, which looks like this:
ssh -L 5901:c06-04:5901 netID@prince.hpc.nyu.edu - Open a terminal from your Mac (local terminal) and paste in the command from above and hit enter, you will be asked for your password (your regular NYU password).
- Open TigerVNC on your computer and enter localhost:X in the server field, where X is the Display Port (590X – If your port from the ssh command above was 5901, you enter 1, if the port was 5902, you enter 2.). Using the command above as an example, the correct entry would be localhost:1
Press the ‘Connect’ button. You will then be asked for a password, enter the password you setup with vncpasswd (not your NYU password!) Click OK and it should launch the desktop. - The first time you launch your remote desktop, you should disable the screensaver lock. Go to Applications -> System Tools -> Settings -> Power and change the setting for Blank Screen to Never. This will prevent you from being locked out of your desktop. This only needs to be done once.
- Now you can run IGV and load any file which you have access to on the HPC. Open a terminal and enter:
> module load igv
> igv.sh - Your VNC session will be active for 12 hours. After this period, you will need to re-launch and connect to your remote desktop by redoing steps 1-4.
Instructions for PC users
Initial Setup:
- Download Putty:
32-bit: https://the.earth.li/~sgtatham/putty/latest/w32/putty.exe
64-bit: https://the.earth.li/~sgtatham/putty/latest/w64/putty.exe - Download and install TightVNC (accept the default settings when installing):
http://www.tightvnc.com/download.php - Setup a VNC password on mercer:
Login to Prince and type the command vncpasswd
If you ever forget your VNC password, you can reset it at anytime by typing vncpasswd again (it will ask you to enter a password, then confirm the password) - Copy this script into your home folder:
prince:/scratch/work/cgsb/scripts/launch_vnc/launch-vnc.sh
Once initial setup is complete, you can launch a vnc session and connect to it at any time by doing the following:
- Submit the sbatch script (which you obtained above) to the queue, like this:
> sbatch launch-vnc.sh - Once the job is running, look for the output file called VNC.o1234567, where ‘1234567’ is your job ID. Open that file and look at the first ssh command, which looks like this:
ssh -L 5901:c06-04:5901 netID@prince.hpc.nyu.edu - From the line above, we know the VNC port is 5901 and the compute node is c06-04. You will need these two values.
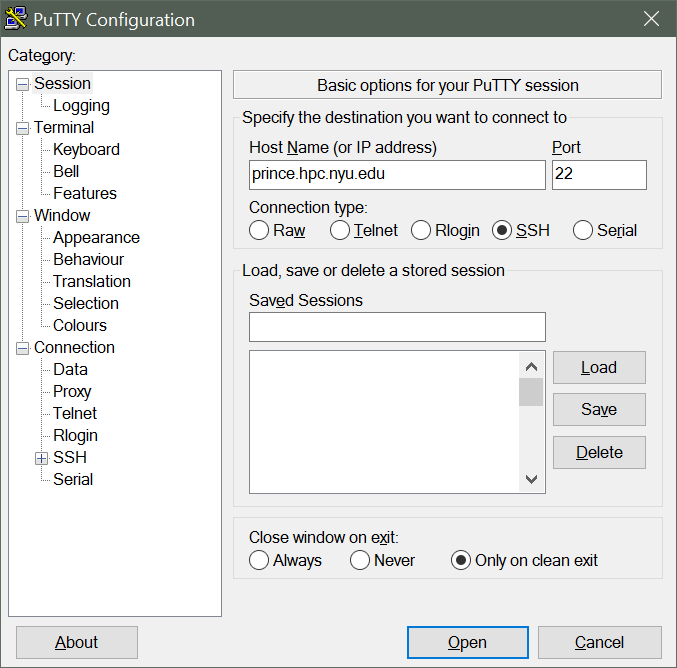
- Open Putty and enter prince.hpc.nyu.edu for Host Name and 22 for Port, as shown below.
- On the left, click to expand the options for ‘SSH’, then click ‘Tunnels’ (a). Enter the port number obtained in step 3 above into the ‘Source Port’ field. In the example shown above, the port number is 5901 (b). For ‘Destination’, enter compute-node:port. In the example above, this is co6-04:5901 (c). Click ‘Add’ (d). Then click ‘Open’ (e). When the terminal opens, authenticate with you NYU netID and password.
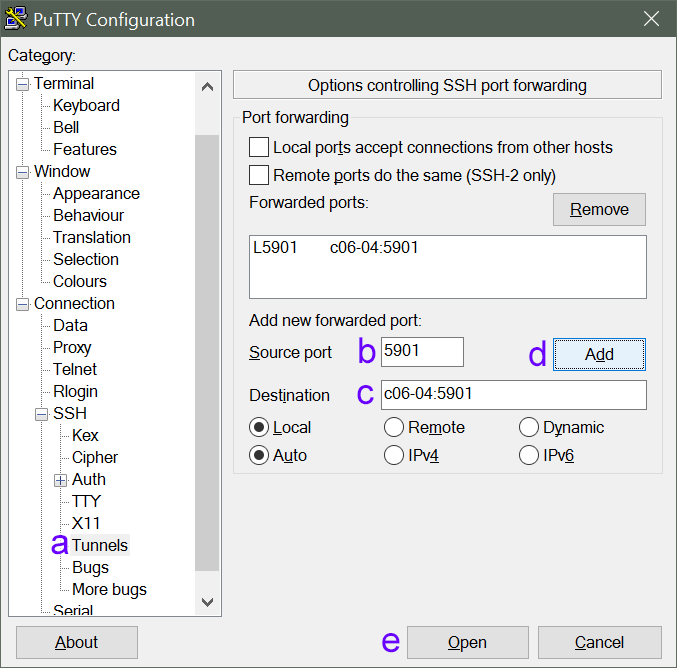
Note: this configuration (Source port + Destination) will need to be updated whenever a new VNC session is launched (whenever you submit a new launch-vnc.sh job). - Launch TightVNC Viewer. Enter the VNC Server as follows:
If your port is 5900, VNC Server: localhost:0
If your port is 5901, VNC Server: localhost:1
If your port is 5902, VNC Server: localhost:2
In the example above, the port was 5901, so we enter localhost:1

- Click Connect, enter your VNC password (not NYU NetID password!) which you created in the initial setup.
- The first time you launch your remote desktop, you should disable the screensaver lock. Go to Applications -> System Tools -> Settings -> Power and change the setting for Blank Screen to Never. This will prevent you from being locked out of your desktop. This only needs to be done once.
- Now you can run IGV and load any file which you have access to on the HPC. Open a terminal and enter:
> module load igv
> igv.sh - Your VNC session will be active for 12 hours. After this period, you will need to re-launch and connect to your remote desktop by submitting the launch-vnc.sh script and configuring a new putty session.


0 Comments