OpenStack, a project originally started by NASA and Rackspace, is an open source cloud computing platform that enables users to access and control pools of compute, storage, and networking resources.
TechCrunch calls it “one of the most important and complex open-source projects you’ve never heard of”.
Like competitor Amazon Web Services (AWS) and other cloud platforms, OpenStack consists of several interrelated components: compute, storage, image management, networking, etc. Together these components deliver a massively scalable cloud operating system.
The principal difference between OpenStack and AWS is that OpenStack is open source and AWS is proprietary. With OpenStack, everything is transparent. Anyone can access the source code, build upon it, and freely share the changes with the community at large. OpenStack has the benefit of thousands of developers all over the world working in tandem to develop the strongest, most robust, and most secure product that they can. It’s backed by some of the biggest companies in software development and hosting including Dell, Cisco, IBM, Intel, and Citrix. The non-profit OpenStack Foundation oversees both development and community-building around the project.
OpenStack is used by numerous universities and research institutions around the world, and companies such as ATT, Verizon, Comcast, and PayPal.
What can you do with OpenStack?
OpenStack allows users to deploy virtual machines on the fly. It makes horizontal scaling easy, which allows for dynamic allocation of resources that scale up or down depending on usage. Consider one simple example of a JupyterHub instance that sees spikes in usage during classes when the JupyterHub server is used. If the resources required during classes were dedicated to JupyterHub permanently, these resources would be idle (and thus wasted) for much of the time when there were no classes. OpenStack allows these resources to be provisioned dynamically to meet the challenges of differing and dynamic workloads. Here are some ways in which OpenStack is being used today:
Research
The European Bioinformatics Institute (EBI), part of the European Molecular Biology Laboratory (EMBL), use OpenStack to power their collaborative research project known as the Embassy Cloud.
The Cloud Infrastructure for Microbial Bioinformatics (Climb) project aims to create the world’s largest single system dedicated to Microbial Bioinformatics research.
OpenStack at The European Organization for Nuclear Research (CERN): Exploring the origins of the universe with high-throughput computing.
NASA’s Jet Propulsion Laboratory is hoping to put humans on Mars by 2030, with the help of OpenStack.
Web Applications
OpenStack is a great option for running web apps such as Jupyter Notebook and Shiny. It’s also great for building and hosting your own web apps which require a web server, full control of your environment (i.e. sudo rights), and the ability to scale quickly if it becomes necessary. At NYU’s Center for Genomics and Systems Biology, the Huang Lab is using OpenStack to to develop a next generation web based genome browser.
Web Hosting
Industry scale managed web hosting providers use OpenStack to power their services. After all, OpenStack was originally started by a web hosting company (Rackspace). For individual users, OpenStack provides a great resource for building and hosting your development site. For production websites however, unless you’re willing to be vigorously committed to keeping your system updated and secure, can ensure 99.9% uptime and data redundancy, implement SSL and CDNs, etc., stick to a professional web hosting company.
Big Data
A primary use case of OpenStack in many areas is being able to provide scalable, elastic infrastructure for big data collection and analytics. For example, automakers (by some accounts the second largest largest generator of data) collect, store, and analyze petabytes of data globally from millions of vehicle sensors, customers, dealers and social media using OpenStack.
Database as a Service (DBaaS)
OpenStack DBaaS runs in the data center, as well as public cloud. Deployment as a private cloud in a data center allows full control over practices and policies for data retention, encryption, backups, etc. OpenStack provides a single framework to operate multiple database technologies in a consistent way. This includes both SQL and NoSQL databases, ones optimized for both operational and analytical workloads, and both commercial and open source products. (In contrast, Amazon AWS only offers a limited number of database options.)
Video Processing and Content Delivery
A popular use case for OpenStack is video processing and content delivery across regions. Here’s an example of how DigitalFilm Tree funnels thousands of hours of video footage to make a 1 hour TV show using a mix of private and public OpenStack clouds.
How to Launch an OpenStack Instance and Setup Jupyter Notebook
-
- Login to your OpenStack dashboard. At NYU it’s https://brooklyn.hpc.nyu.edu
Domain: NYU
User Name: Your NYU NetID
Password: Your NYU PasswordNote: You must be on the NYU network (on campus or on VPN) to access the NYU OpenStack portal.

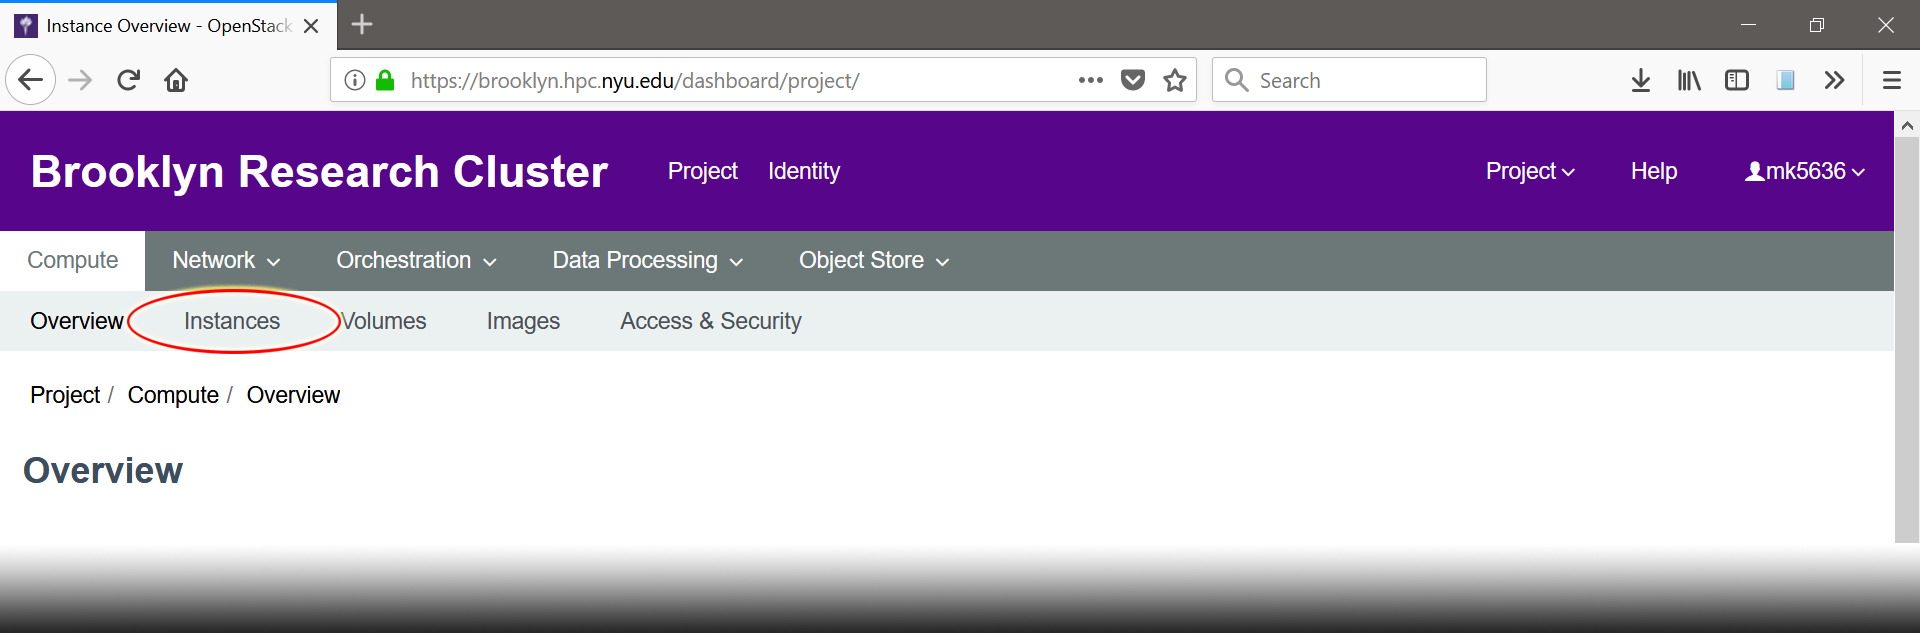
- Once you’re logged in, click on “Instances” under the “Compute” tab.
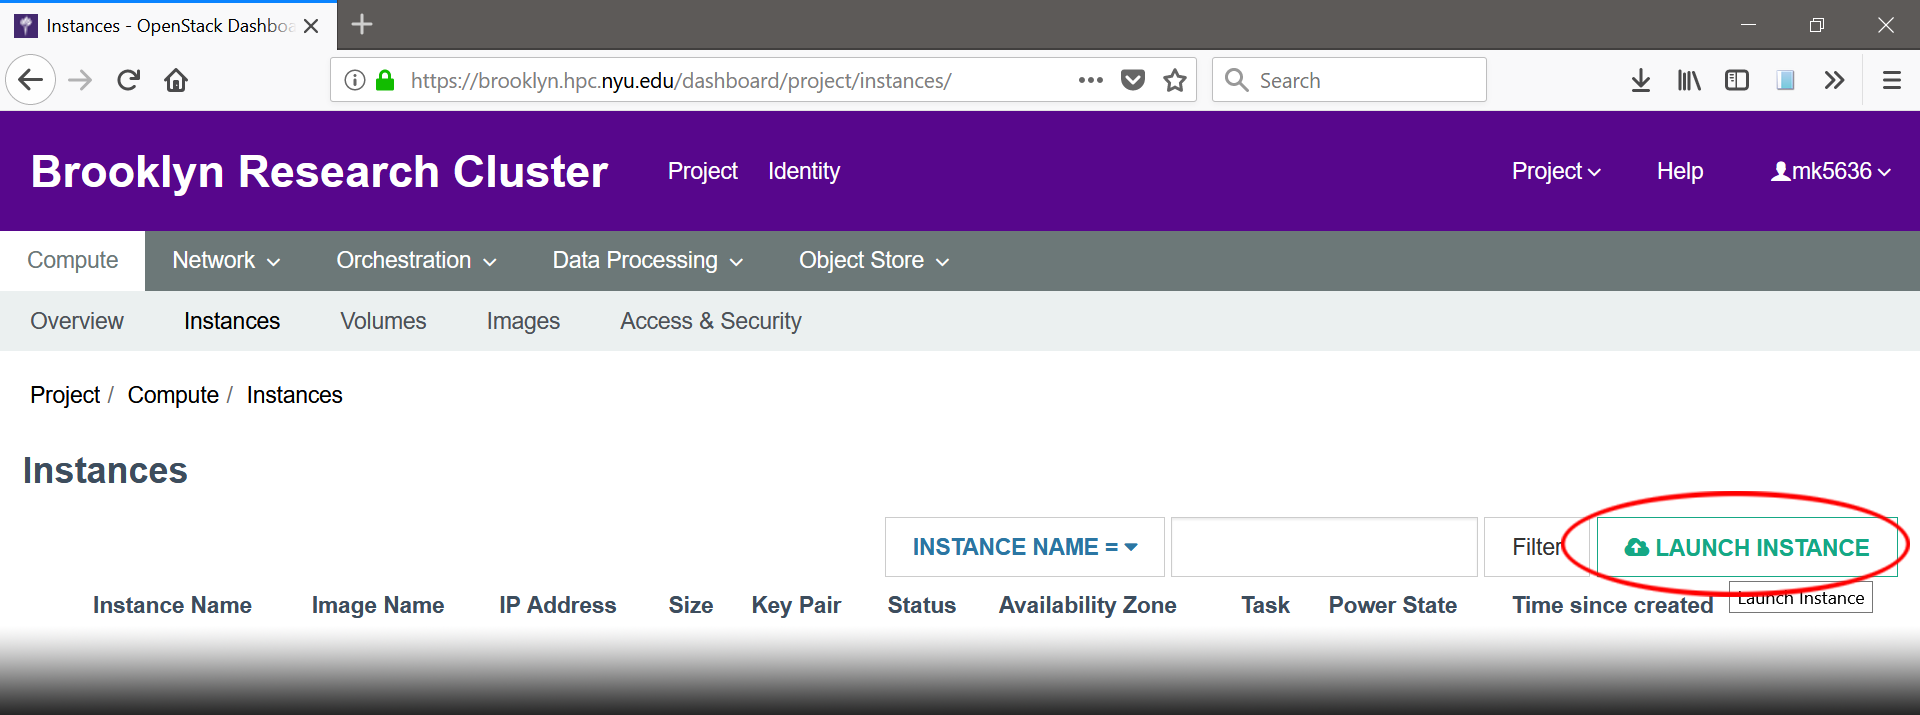
- Click “Launch Instance”.
- Provide your new instance with a name (ex: my_instance). Keep “Availability Zone” as nova, and “Count” as 1.

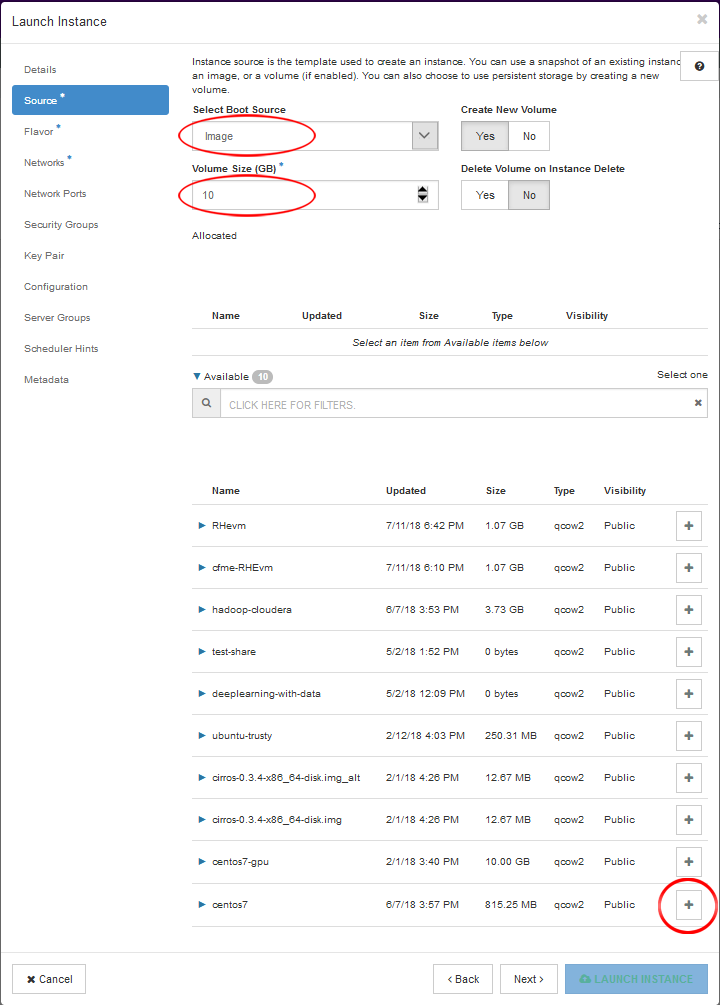
- Click “Source”, select image from “Select Boot Source”, and give it 10GB or more for “Volume Size”. Scroll to the bottom and click the “+” button beside “centos7” to select this image for your instance.
- Next click on “Flavor”, then select the type of system you wish to deploy. For this tutorial, we’ll use the p100-1-tiny setup. Click the “+” button to allocate these resources to your instance.

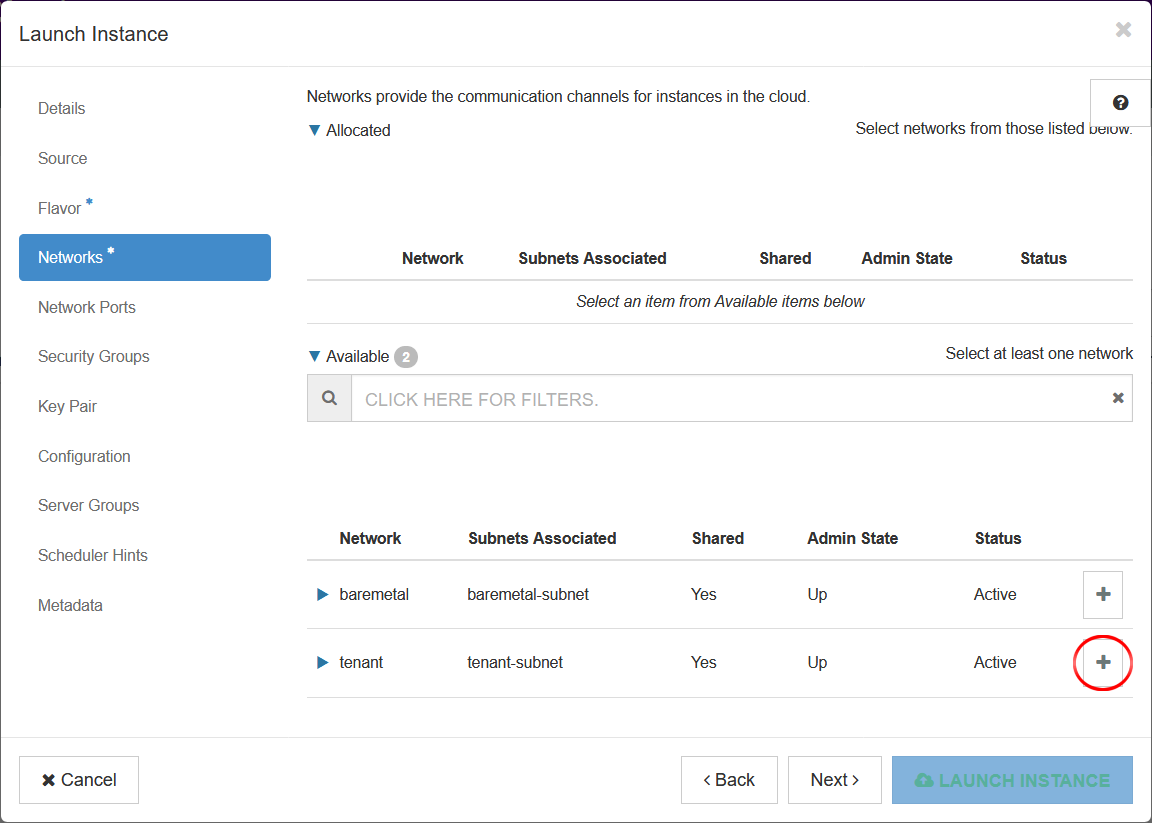
- Click “Networks”, then add the tenant network.
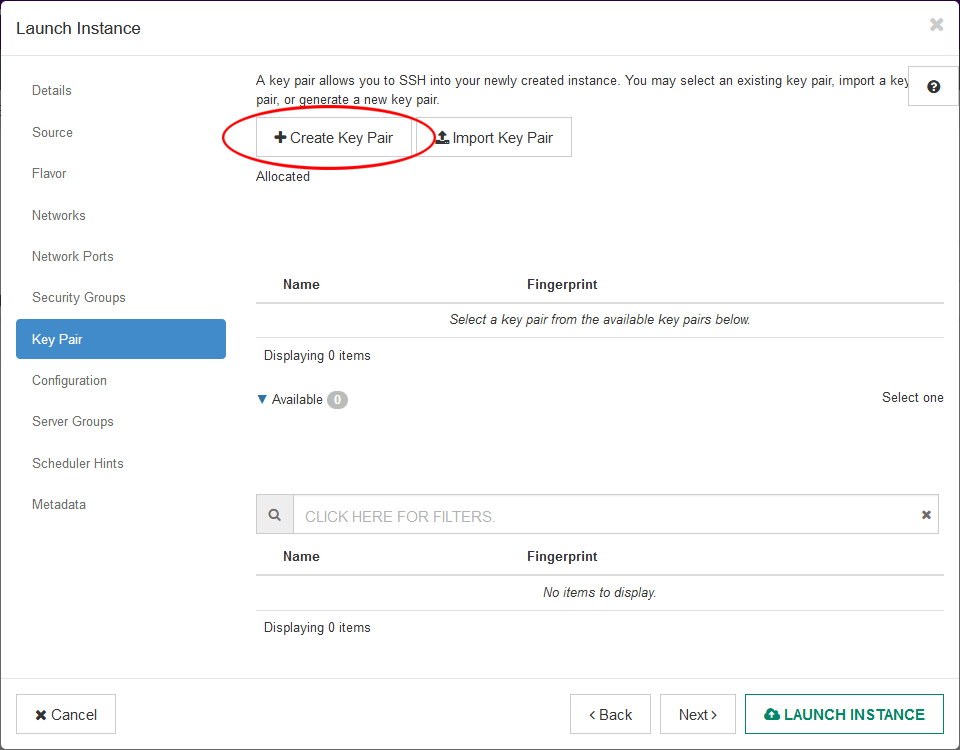
- Click “Key Pair”, then click + Create Key Pair
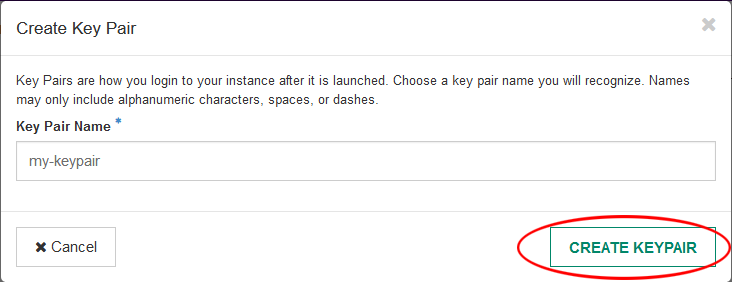
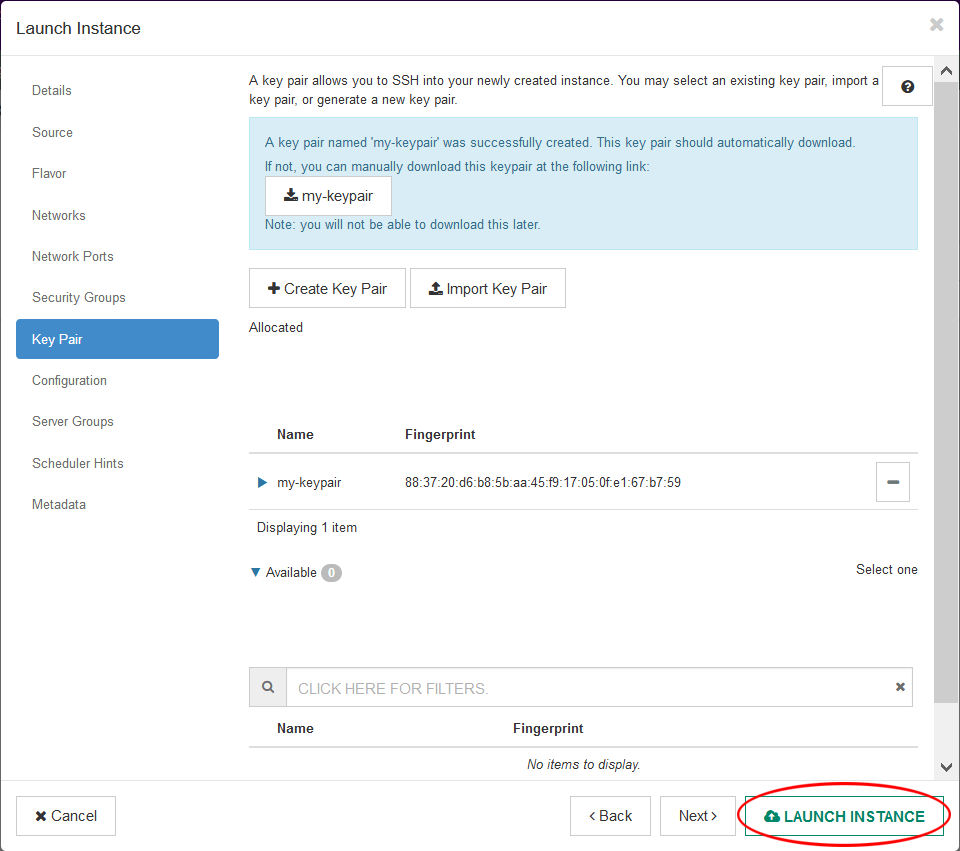
- Give your Key Pair a name, then click Create Keypair. This will create the new key pair and automatically download it onto your computer. Keep this file in a safe and secure place, you will need it to login to your instance.
- Click “Launch Instance”
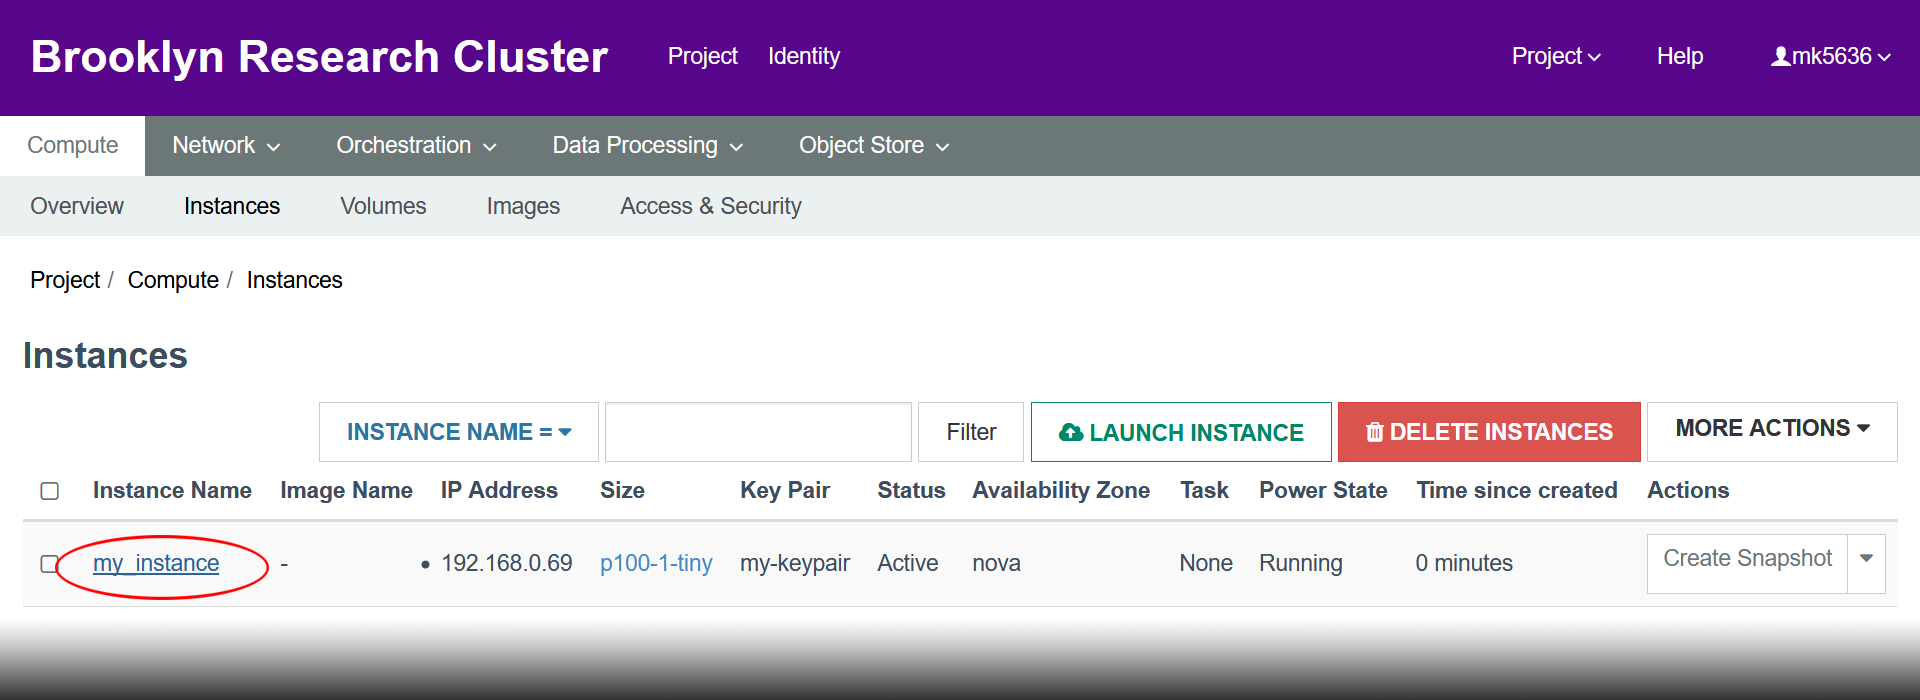
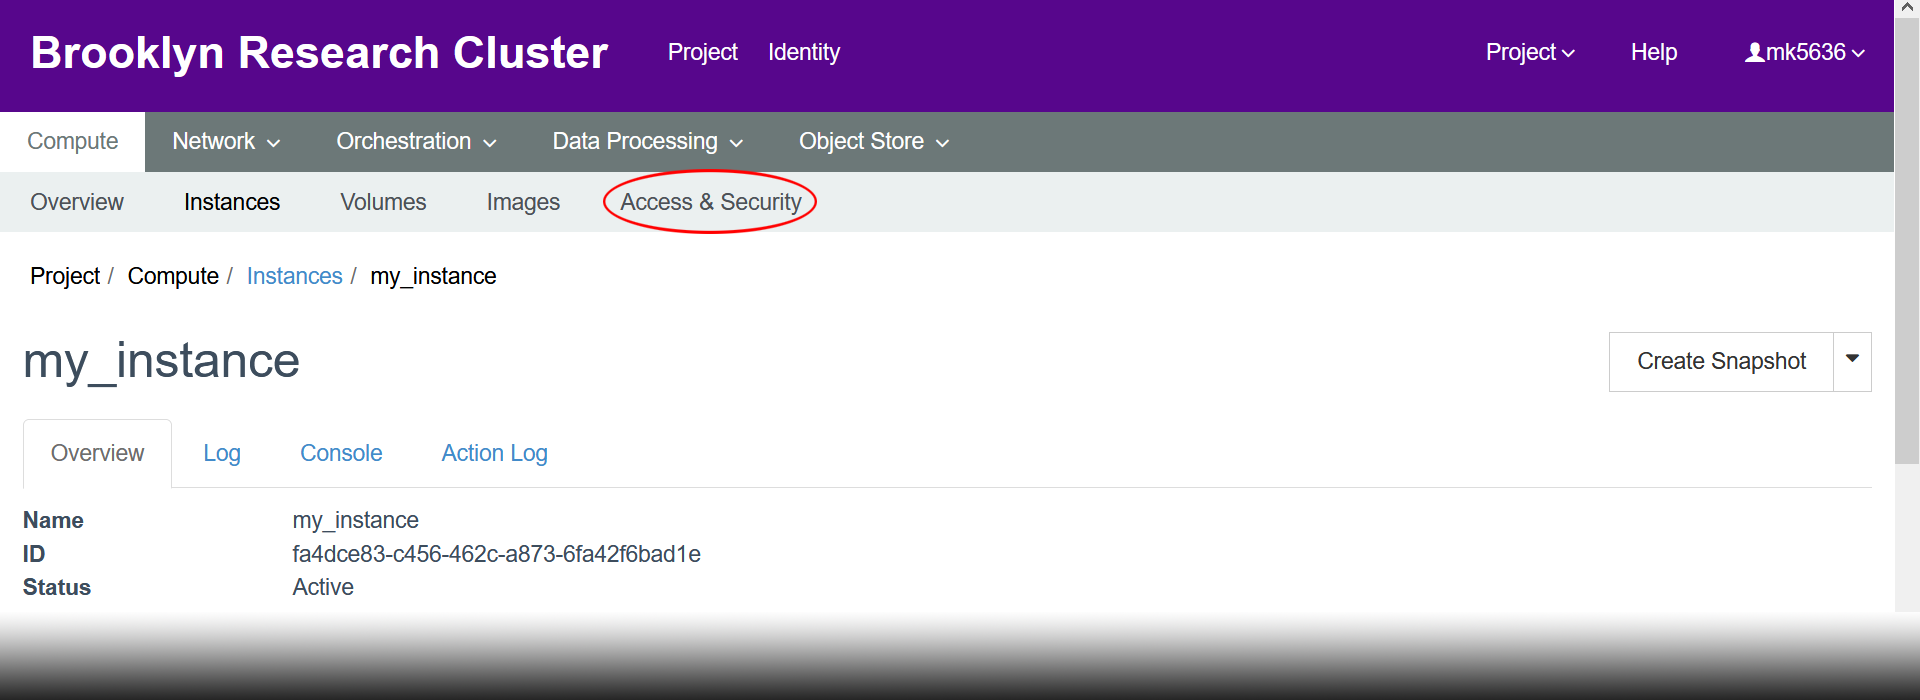
- It might take a minute before your instance is ready. Once it’s ready, click on it to bring up the instance overview.
- Click “Access & Security”.
- Click “Manage Rules”.

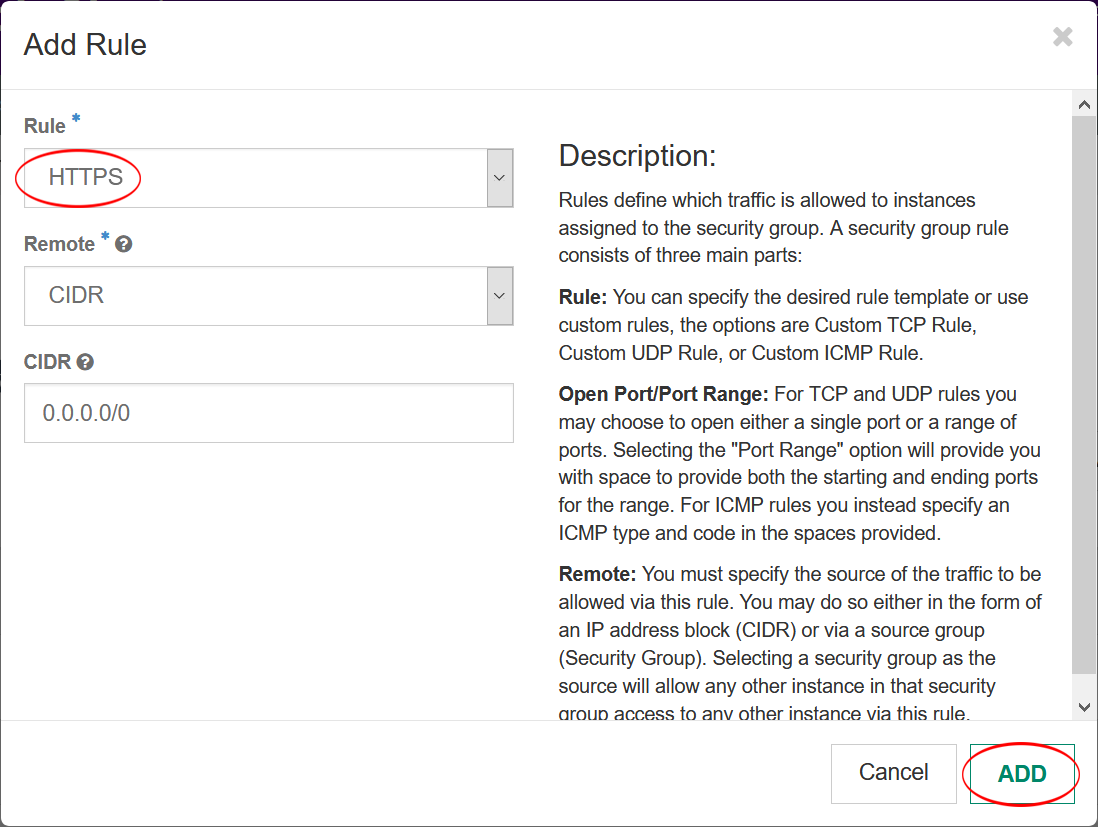
- Click “+ Add Rule”.

- Select SSH for “Rule”, then click “Add”. We need to allow this to be able to connect to our instance via SSH.

- Click “+ Add Rule” again, and add the HTTPS rule. We need to allow this to be able to connect to our jupyter notebook through a web browser.
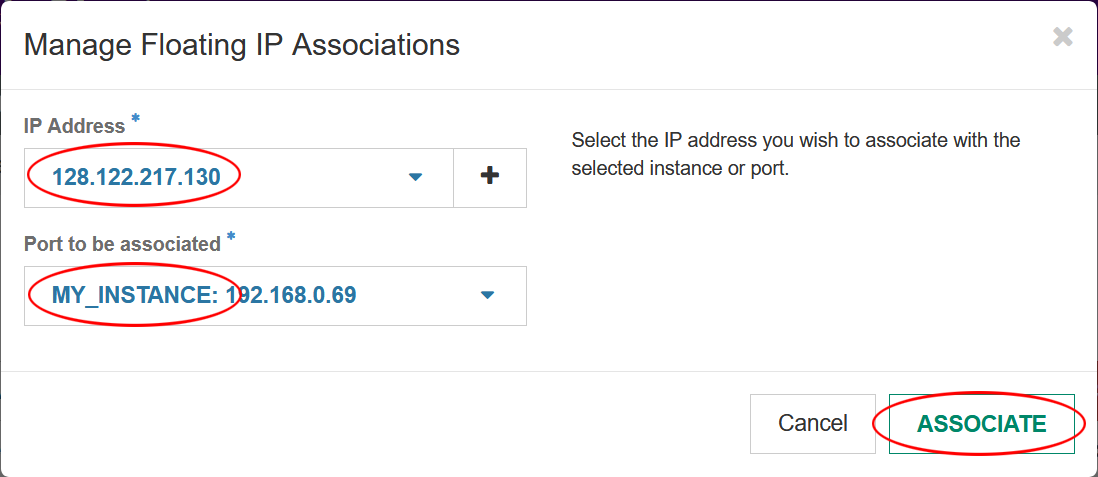
- Click “Instances”, then select “Associate Floating IP” from the Actions drop-down menu.

- Select an IP address from the “IP Address” drop-down, select your newly created instance from the “Port to be associated” drop down, then click “Associate”.
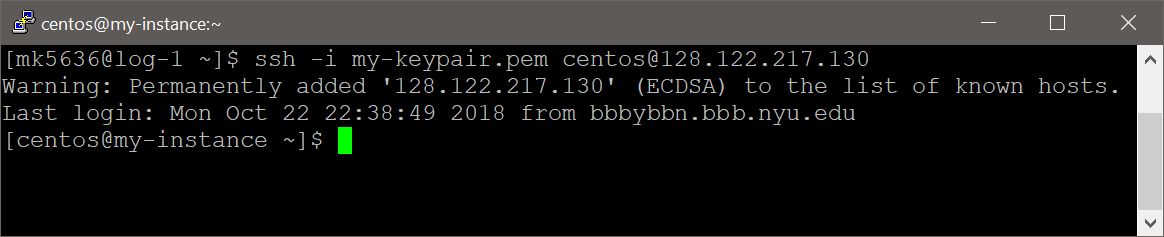
- Connect to your new instance via ssh using the floating IP address you associated in the previous step and the
keypair.pemfile you downloaded in step #9. You can find always see your floating IP address on the instances overview screen.SSH Command:ssh -i <keypair.pem> centos@<floating_ip>
Example:
ssh -i my-keypair.pem centos@128.122.217.130

- We now have a fresh system on which we will setup Jupyter. We’ll use Anaconda for this which will take care of installing Python and all required dependencies, making setup a breeze. Since we have a fresh system, we need to install a few basic tools first to be able to download and install Anaconda:
sudo yum update
sudo yum install wget bzip2
If it asks you the following:
Is this ok [y/d/N]:
Enter
yand press return. - Next, download and install Anaconda. Be sure to get the latest version from:
https://www.anaconda.com/download/#linuxwget https://repo.anaconda.com/archive/Anaconda3-5.3.0-Linux-x86_64.sh sh Anaconda3-5.3.0-Linux-x86_64.sh
- Restart the terminal and enter the following command:
jupyter notebook
NYU users need to do a couple work-arounds due to stringent security protocols:
- Switch to root
sudo su -
- Source the centos user
.bashrcfile (to load the necessary$PATHvariables)source /home/centos/.bashrc
- Enter the following command to launch Jupyter
jupyter notebook --ip=0.0.0.0 --port=443 --allow-root --no-browser
- Switch to root
- If everything was successful, you should see something like the following. Pay attention to the
tokenin the last line, you’ll need this in a moment. In this example, it’s26340a16487173a8a3c58342ccb4c7248b4bc817cdf84de0[centos@my-instance ~]$ jupyter notebook [I 23:50:21.114 NotebookApp] JupyterLab extension loaded from /home/centos/anaconda3/lib/python3.7/site-packages/jupyterlab [I 23:50:21.114 NotebookApp] JupyterLab application directory is /home/centos/anaconda3/share/jupyter/lab [I 23:50:21.118 NotebookApp] Serving notebooks from local directory: /home/centos [I 23:50:21.118 NotebookApp] The Jupyter Notebook is running at: [I 23:50:21.119 NotebookApp] http://(my-instance.novalocal or 127.0.0.1):443/?token=26340a16487173a8a3c58342ccb4c7248b4bc817cdf84de0 [I 23:50:21.119 NotebookApp] Use Control-C to stop this server and shut down all kernels (twice to skip confirmation). [W 23:50:21.119 NotebookApp] No web browser found: could not locate runnable browser. [C 23:50:21.119 NotebookApp] Copy/paste this URL into your browser when you connect for the first time, to login with a token: http://(my-instance.novalocal or 127.0.0.1):443/?token=26340a16487173a8a3c58342ccb4c7248b4bc817cdf84de0
- Now, connect to your jupyter notebook through your web browser by going to the following address:
http://<floating_ip>:443/
Where
<floating_ip>is your Floating IP Address from Step #18 above.Example:
http://128.122.217.130:443/
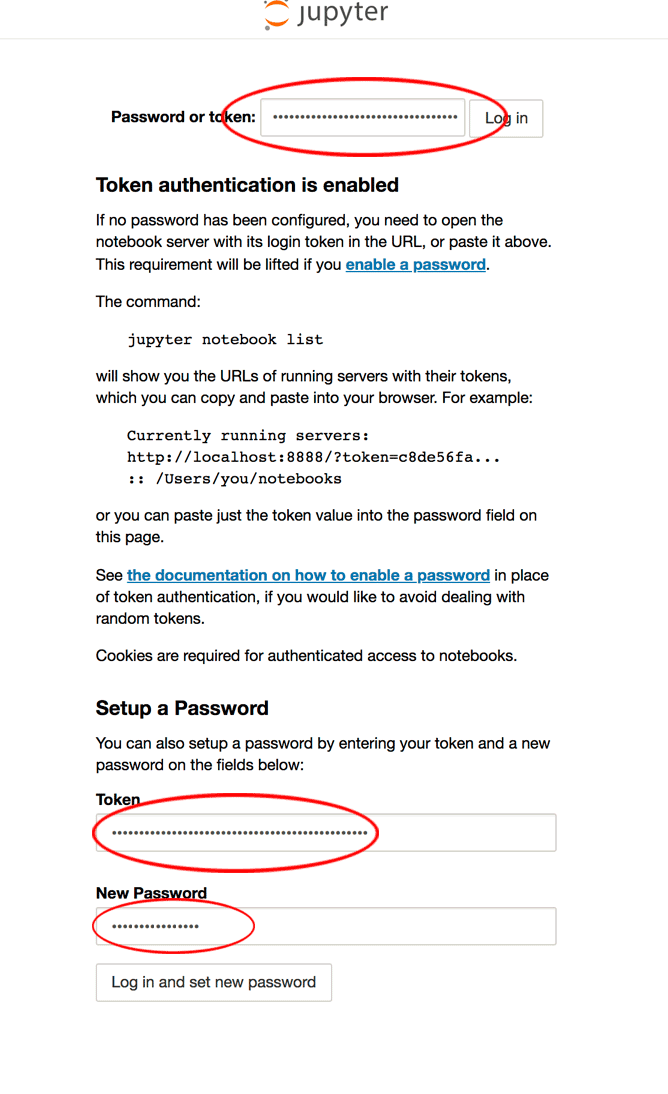
- Login with your
tokenwhich you receive in Step #23 above. Alternatively, use your token to create a password which you can use for authentication going forward. Note that you will need to restart jupyter notebook before your new password will take effect.
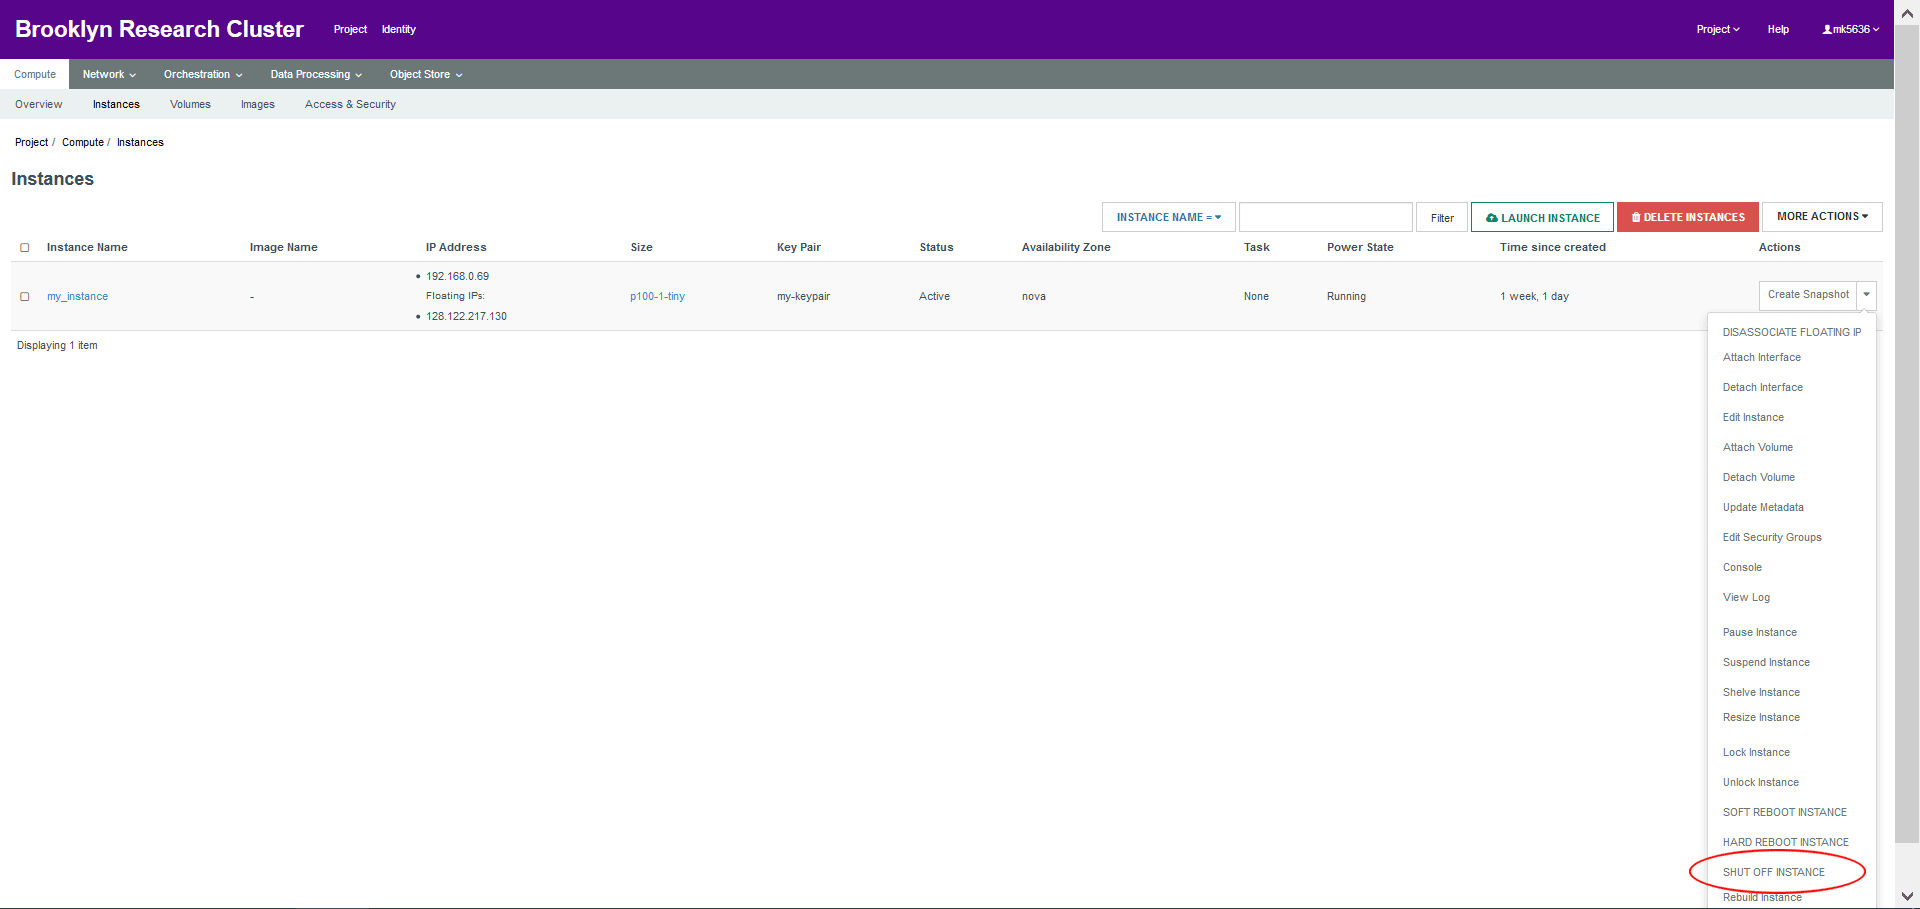
- Congratulations, you’ve launched your very own jupyter notebook in the cloud using OpenStack! When you’re done working with your instance, be sure to shut down your instance from the Actions drop-down menu on your Instances page. The next time you want to work with your jupyter notebook, simply restart your instance, enter the jupyter notebook command above, and connect through your web browser.
- Login to your OpenStack dashboard. At NYU it’s https://brooklyn.hpc.nyu.edu


0 Comments