In this post we will build a pipeline for the HPC using Python 3. We will begin by building the foundation for a pipeline in Python in part 1, and then use that to build a simple NGS analysis pipeline in part 2.
At NYU, we submit jobs to the HPC using the Slurm Workload Manager. Therefore, we will implement this pipeline using Slurm, however this could easily be substituted for PBS or another similar scheduler.
This tutorial assumes basic level familiarity with Slurm and Python.
Part 1: Building a template for submitting jobs to Slurm in python
The first thing we will do is build a function in python that will be used to submit jobs to Slurm. The function will submit an sbatch job through the command line using the subprocess python package.
Let’s start by taking alook at an example of submitting a simple job Slurm directly from the command line, one that just prints “Hello World”.
sbatch -J my_simple_job -o my_simple_job.out -e my_simple_job.err --wrap='echo Hello World'
If you execute this command on the Prince or Dalma HPC, you should end up with two new files after the job completes (it should only take a second to finish):
my_simple_job.out
my_simple_job.err
If you look in my_simple_job.out you should see the text “Hello World”.
Let’s break down the command we just used. If you’re familiar with submitting Slurm jobs, this should be review:
sbatch: calling the scheduler
-J: job name
-o: standard out filename
-e: standard err filename
--wrap: this is the most important part, the command you wish to run. In this example, we simply asked to echo “Hello World”.
Let’s put this same command in a python function (we’ll call it sbatch()), and see how we can use this as a template to submit all our jobs. Note that we make use of the subprocess package to execute something on the command line from python. Before we use the subprocess package, we have to import it.
import subprocess

def sbatch():
     sbatch_command = "sbatch -J my_simple_job -o my_simple_job.out -e my_simple_job.err --wrap='echo Hello World'"
     sbatch_response = subprocess.getoutput(sbatch_command)
     print(sbatch_response)

sbatch() # call the sbatch function
Save that as simple.py. If you run this python script (python3 simple.py), you should see a response from sbatch (indicating the ID of the job submitted), and you should find the same file my_simple_job.out with the text “Hello World”. Try change the job name, output file names, or command, and re-run the script.
Let’s transform the sbatch function above into something more flexible.
def sbatch(job_name, command):
    sbatch_command = "sbatch -J {} -o {}.out -e {}.err --wrap='{}'".format(job_name, job_name, job_name, command)
    sbatch_response = subprocess.getoutput(sbatch_command)
    print(sbatch_response)
We introduce two new parameters to the function: job_name and command. We also make use the string format method in order to build strings easily. Let’s take a quick look at a couple simple examples of the string format method in Python.
name = "Rick"
print( "Hello {}".format(name) )
# prints "Hello Rick"

first_name = "Rick"
last_name = "Sanchez"
print( "Hello {} {}".format(first_name, last_name) )
# prints "Hello Rick Sanchez"
The nice thing about this method is that it automatically formats any field into a string, so you can fill values with integers, floating point numbers, mathematical functions, etc. Let’s Take a look at one final example:
some_integer = 7
some_float = 2.99
print( "{} + {} = {} ".format(some_integer, some_float, some_integer + some_float) )
# prints "7 + 2.99 = 9.99"
Let’s go back to our sbatch example. What we have now is a function that we can send a job_name and a command, and the function will build the sbatch command using job_name as the Job Name and stdout/stderr file names, and will put whatever command we give it in the ‘wrap’ argument. Let’s try the same basic Hello World example using our new template.
import subprocess
def sbatch(job_name, command):
    sbatch_command = "sbatch -J {} -o {}.out -e {}.err --wrap='{}'".format(job_name, job_name, job_name, command)
    sbatch_response = subprocess.getoutput(sbatch_command)
    print(sbatch_response)

sbatch("my_simple_job", "echo Hello World") # call the sbatch function, but provide job_name and command parameters.
Let’s add some additional parameters that we might want to use when submitting a job to sbatch: time, memory, and tasks. We will give each of these parameters a default value so they don’t need to be specified everytime you call sbatch(), unless you want to override them. Let’s also add a mail option so Slurm will email us if our job ever fails.
def sbatch(job_name, command, time=4, mem=60, tasks=20):
    sbatch_command = "sbatch -J {} -o {}.out -e {}.err --mail-user=$USER@nyu.edu --mail-type=FAIL -t {}:00:00 --mem={}000 --ntasks-per-node={} --wrap='{}'".format(job_name, job_name, job_name, time, mem, tasks, command)
    sbatch_response =
    subprocess.getoutput(sbatch_command)print(sbatch_response)
We now have function that allows us to quite easily submit any command we want to the Slurm scheduler, control some common job parameters, and notify us by email in case of failure. The final piece required to make this function operable in a pipeline is support for dependencies. We need this function to do two more things:
1) return a job id that can be passed as a dependency to another job
2) allow the sbatch function to accept a dependency, optionally
Let’s tackle #1 first:
When you submit an sbtach job, you typically receive a response like this:
Submitted job 123456789
We’re interested in just the job number. There are a few different ways to extract this number from the response, we’ll use a simple string split and take the last element:
job_id = sbatch_response.split(' ')[-1].strip()
The command above takes the sbatch_response (which is the output of running the sbatch command with subprocess.getoutput()), splits it based on the space (‘ ‘) delimiter, takes the last element (the job ID), and strips away any spaces or newline characters leaving just the job ID.
Now let’s implement support for #2: enabling the function to accept an optional dependency parameter.
We’ll start by adding a parameter called dep to the sbatch function definition and assigning it a default value of nothing (empty string).
def sbatch(job_name, cmd, time=4, mem=60, tasks=20, dep='')
Now we’ll add a couple new lines at the top of the function to check if the dependency is empty or not, and add the required parameters to the sbatch command if it’s not empty. We also add the lines to parse the and return job_id.
def sbatch(job_name, command, time=4, mem=60, tasks=20, dep=''):
    if dep != '':
        dep = '--dependency=afterok:{} --kill-on-invalid-dep=yes '.format(dep)

    sbatch_command = "sbatch -J {} -o {}.out -e {}.err --mail-user=$USER@nyu.edu --mail-type=FAIL -t {}:00:00 --mem={}000 --ntasks-per-node={} --wrap='{}' {}".format(job_name, job_name, job_name, time, mem, tasks, command, dep)
    sbatch_response = subprocess.getoutput(sbatch_command)
    print(sbatch_response)
    job_id = sbatch_response.split(' ')[-1].strip()
    return job_id
Note that the dep parameter is always included in the sbatch command that we send to the command line. If there is no dependency specified, then dep will be an empty string.
We now have a function that can be used to build a fully functioning pipeline with dependencies!
Part 2: Building a Pipeline
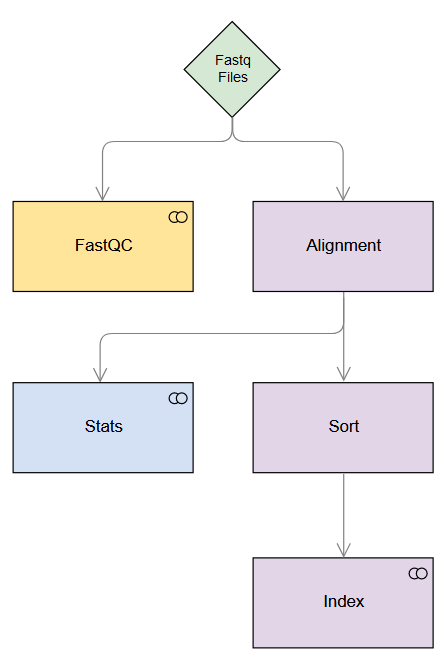
In part 1 we built a template function to submit jobs to the HPC. In part 2, we will use this function to build a pipeline. For the purpose of this tutorial, we will implement a simple NGS analysis workflow consisting of FastQC, alignment, sorting, indexing, and generating alignment statistics.
Using dependencies in a pipeline allows us to maximize the resources we can use while minimizing the wait time to run our jobs. This also allows individual jobs to run in parallel (where possible), reducing our overall analysis time even further.
The figure below depicts the simple pipeline we will build. Note the dependencies (indicated with arrows) and the steps which run in parallel (same row).
1. Input files
We’ll use a single-end fastq file and we’ll align to the Unicorn genome.
input_1 = sample_R1.fastq
ref = Unicorn_v1.fa
For the purpose of this exercise, we’ll assume the index files for the aligner are already built.
2. Build the individual steps
Here’s the command for running fastqc:
fastqc file.fastq
We’ll build a function for each step of the workflow to keep things organized. These functions will call the sbatch() function we created above.
def fastqc():
    # Build the command for fastqc
     command = "fastqc {}".format(input_1)

     # Pass job name and command to sbatch
     # sbatch() will return the job_id
     job_id = sbatch('fastqc', command)

    # Return the job id
     return job_id
Now let’s build the functions for the remaining steps
Alignment:
def alignment():
    command = "bowtie2 -x {} -U {} > output.sam".format(ref, input_1)
    job_id = sbatch('align', command)
    return job_id
Note: The next three steps require a dependency, i.e. they require a previous job to complete before they can be started. For this reason, we will add the dep parameter to the following functions.
Stats:
def stats(dep=''):
    command = "samtools flagstat output.sam > stats.txt"
    job_id = sbatch('stats', command, dep=dep)
    return job_id
Sort:
def sort(dep=''):
    command = "samtools sort output.sam -o output.sorted.bam"
    job_id = sbatch('sort', command, dep=dep)
    return job_id
Index:
def index(dep=''):
    command = "samtools index output.sorted.bam output.sorted.bai"
    job_id = sbatch('index', command, dep=dep)
    return job_id
3. Build the pipeline
Now that we have all our individual functions for each step built, we can stitch them together in a pipeline. Most of the heavy lifting is already done, this part is the easiest.
fastqc_jobid = fastqc()
alignment_jobid = alignment()

# Stats needs the alignment to complete before it can begin, so we pass
# alignment_jobid to the stats() function
stats_jobid = stats(alignment_jobid)

# Sort needs the alignment to complete before it can begin, so we pass
# alignment_jobid to the sort() function
sort_jobid = sort(alignment_jobid)

# Note: Both stats() and sort() will be submitted simultaneously when the the alignment job is complete

# Index needs sorting to complete before it can begin, so we pass sort_jobid to index()
index_jobid = index(sort_jobid)
4. Putting it all together
Below you will find the full code for this pipeline. I’ve added three new components:
a) Parse the sample id (from the input file name) and use this to name the outputs of the pipeline
b) Override some of the default sbatch job parameters (ex: tasks, memory, and time) for the alignment job
c) Load respective modules (required for NYU’s HPC). I add this directly into the command for each step.
import subprocess

# Inputs
input_1 = 'sample_R1.fastq'
ref = 'Unicorn_v1.fa'

# Parse the sample id so we can use it to name the outputs
# sample_id in this example will be 'sample_R1'
sample_id = input_1.split('.')[0]

def sbatch(job_name, command, time=4, mem=60, tasks=20, dep=''):
    if dep != '': dep = '--dependency=afterok:{} --kill-on-invalid-dep=yes '.format(dep)

   sbatch_command = "sbatch -J {} -o {}.out -e {}.err --mail-user=$USER@nyu.edu --mail-type=FAIL -t {}:00:00 --mem={}000 --ntasks-per-node={} --wrap='{}' {}".format(job_name, job_name, job_name, time, mem, tasks, command, dep)

   sbatch_response = subprocess.getoutput(sbatch_command)
   print(sbatch_response)

   job_id = sbatch_response.split(' ')[-1].strip()
   return job_id

def fastqc():
   # Build the command for fastqc
   command = "module load fastqc/0.11.5; fastqc {}".format(input_1)

   # Pass job name and command to sbatch
   # sbatch() will return the job_id
   job_id = sbatch('fastqc', command)

   # Return the job id
   return job_id

def alignment():
   command = "module load bowtie2/intel/2.3.2; bowtie2 -x {} -U {} > {}.sam".format(ref, input_1, sample_id)
   job_id = sbatch('align', command, time=8, mem=120)
   return job_id

def stats(dep=''):
   command = "module load samtools/intel/1.6; samtools flagstat {}.sam > {}_stats.txt".format(sample_id, sample_id)
   job_id = sbatch('stats', command, dep=dep)
   return job_id

def sort(dep=''):
   command = "module load samtools/intel/1.6; samtools sort {}.sam -o {}.sorted.bam".format(sample_id, sample_id)
   job_id = sbatch('sort', command, dep=dep)
   return job_id

def index(dep=''):
   command = "module load samtools/intel/1.6; samtools index {}.sorted.bam {}.sorted.bai".format(sample_id, sample_id)
   job_id = sbatch('index', command, dep=dep)
   return job_id

#Run the pipeline!
fastqc_jobid = fastqc()
alignment_jobid = alignment()
stats_jobid = stats(alignment_jobid)
sort_jobid = sort(alignment_jobid)
index_jobid = index(sort_jobid)
Congratulations! You’ve completed the tutorial. If you were following along, you should have the following output files once the pipeline has finished:
sample_R1_fastqc.zip
sample_R1_fastqc.html
sample_R1.sam
sample_R1_stats.txt
sample_R1.sorted.bam
sample_R1.sorted.bai
Post below if you have any questions and I’ll do my best to answer.


3 Comments
Long Dang · 2022-02-07 at 2:56 pm
Hi, thank you for the useful post. I encountered the following error message when trying to run the Python program named simply.py.
/bin/sh: -c: line 0: unexpected EOF while looking for matching `”
/bin/sh: -c: line 1: syntax error: unexpected end of file
Simply adding a single quote to the first statement under the sbatch(job_name, command) function will help overcome the issue. Many thanks.
Mohammed Khalfan · 2022-02-11 at 6:08 pm
Fixed, thank you!
Long Dang · 2022-03-22 at 1:27 pm
Hello Mohammed, I want to start an “srun” interactive session in Python. I will run a Python program in the interactive session. Is it possible to do it with the subprocess module? Many thanks.